
Help
Short answers to doing things in TillPenny. Can't find it? Write to support@tillpenny.com.
No topic matches that. Try another word, or write to support@tillpenny.com.
Getting started
Add your first receipt
- Press + New receipt at the top.
- Press Scan a receipt on a phone (it opens the camera), or Upload a receipt on a computer. On a computer you can also drop the file on the box.
- The receipt is read for you and fills in the form. Check what it filled in: a short note says what it found and anything worth a look.
- Press Save receipt, or Save and add another to go straight on to the next one.
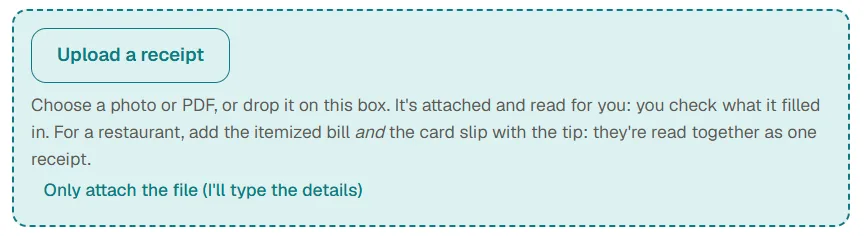
Nothing is saved until you press Save. If the reading misses something, just type it: what you type always wins.
Before the first receipt, the owner can set up the categories and cards under Settings (see Categories, cards and Paid by).
Put TillPenny on your phone
TillPenny works in the phone's browser, and can sit on the home screen like an app (it opens straight to a new receipt).
- iPhone or iPad: open tillpenny.com in Safari, tap the Share button, then Add to Home Screen.
- Android with Chrome: tap the menu (three dots) at the top, then Install and create shortcut (or Add to Home screen).
- Samsung Internet: tap the menu (three lines) at the bottom, then Add page to and Home screen.
When you're signed in on a phone, a bar at the bottom says the same for your browser. Not now hides it for 30 days on that phone.
Who can do what
Everyone in an account has one of three roles:
- Owner: everything, including the lists, people and Settings.
- Member: adds and changes receipts and income, uses bulk upload and the duplicate check.
- Accountant: reads and downloads everything, asks and answers questions, and changes nothing except ticking entries as posted. Their menu has only Receipts.
Everyone, accountants included, can open every receipt and its files and use every download. The owner adds people and sets their role under Settings, People.
Receipts and income
Scan or upload a receipt
On the new receipt form, Scan a receipt (phone) or Upload a receipt (computer) attaches the file and reads it: paid to, date, total, amount before taxes, tip, currency, category, the card (by its last 4 digits) and each tax.
- Photos (JPEG, PNG, WebP) and PDFs, up to 20 MB each.
- A restaurant bill and its card slip with the tip: add both. After the first, Add another part (e.g. the card slip) reads them together as one receipt, up to 4 files.
- iPhone HEIC photos can't be read here. Upload from the iPhone itself (it converts them), or save the photo as JPEG first.
- To keep the file without reading it, choose Only attach the file (I'll type the details).
Each account has a number of readings a month. When they're used up, you can still fill in the form by hand.
If a card isn't picked by itself, the note says its last 4 digits: the owner can add them to that card under Settings, Cards and accounts, and it will be picked next time.
Fill in or change the details
- Date, Paid to and Total are always needed, and a receipt always needs its photo or PDF. The owner can make more fields required (see Receipt fields).
- Total is everything paid, with taxes and tip.
- Before taxes: leave it empty if the receipt doesn't print it; it is worked out.
- Taxes: one line per tax printed on the receipt, like GST 2.25. Leave the other lines empty.
- In Canada and some other countries, there is a box for the supplier's tax number (needed on receipts from $100 to claim the tax back).
- Tick Needs another look later to mark it To review; otherwise it is Done.
- A bank fee, interest or card fee has no receipt: tick There's no receipt for this and it saves without a photo (the list shows "(no receipt)").
- A personal purchase on a business card: open the entry and press Mark as personal. It stays on record but leaves the list, the totals and the downloads; the Personal tab beside All, Expenses and Income shows them, and Business after all brings one back.
To change a saved receipt, open it and press Change. Files already attached stay; you can add more. Every change is kept in the receipt's History.
Record income
Press + New income for money you received: a commission, a payment from a customer, rent.
Scan an invoice or statement reads who paid you, the amount, the tax you charged and the reference. The file is optional for income.
The form says Received from, Amount received (with the tax collected), Tax collected, Income category and Received into. Income shows in green with an Income badge, has its own Income tab on the list, and is added up apart from expenses.
Several at once: Bulk upload, then the Income (money received) tab.
Split a receipt across categories
For one receipt that covers several things (supplies and repairs, say):
- On the form, open Split it across categories.
- Give each line an amount and a category. + Add a line adds more, up to 10.
- The lines must add up to the total, taxes and tip included. A line under them says how much is still to assign.
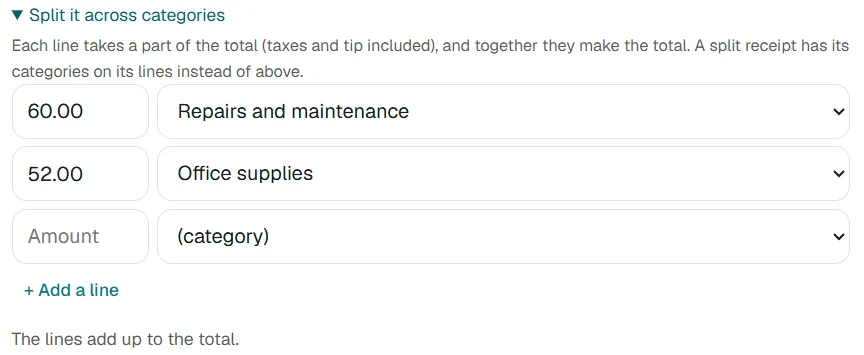
A split receipt shows Split with its lines, and Split (2) (or however many) on the list. Filtering by a category finds it by any of its lines, and the downloads count each line in its own category.
Bulk upload many receipts at once Owners and members
Bulk upload in the menu takes up to 20 photos or PDFs at a time (choose them, or drop them on the box). Each one is read and becomes a row you can check and correct.
- Set for all rows fills in the same category, card, project and so on for every row.
- A bill and its card slip are paired by themselves (Card slip for row 3), and a second file of the same purchase is attached to it (Same purchase?). Tick Save on that row to keep it separate instead.
- A receipt that looks already saved says Already entered? and isn't saved unless you tick Save.
When the rows look right, press the Save button (Save 12 receipts, with your number). Rows with something missing stay in the table, marked in red, so you can fix them and press Save again. Income has its own tab, Income (money received).
Find, sort and filter
On Receipts:
- All, Expenses and Income tabs at the top.
- The search box looks in paid to and notes (and project).
- On a computer, click a column heading to sort, or to show only some: dates (This month, Last year, your own dates...), a business, a category, a card, To review, or Only ones that need a check.
- Under the Date heading, Date added to TillPenny sorts by when entries were put in (Newest added first), or shows only those added between two days. Pointing at an entry's date shows when it was added.
- On a phone, use Sort and filter.
- What's filtered shows under Showing:; the x on each takes it off, Clear all takes them all off.
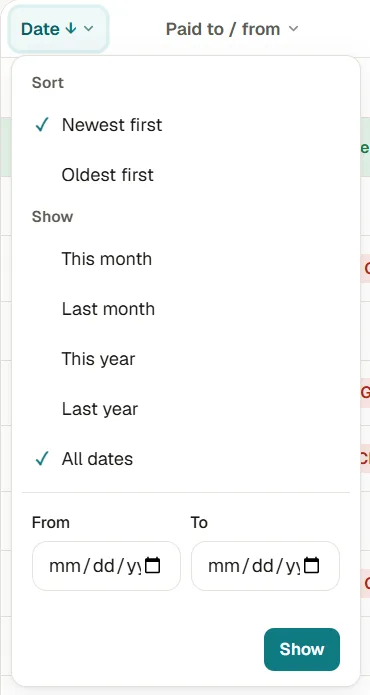
The tiles above add up what is shown: totals, each tax and tips. Only the first 1000 entries are listed; the downloads always have them all.
Change several entries at once
On a computer, press Change several beside Download on Receipts. A tick box shows at the start of each row: tick the entries (or click their rows; the box in the heading ticks every one shown), then in the bar at the bottom choose a Category..., Paid with..., Posted... or Personal... and press Apply. Done puts the list back. Tip: filter first (one business, say), then tick them all.
Each entry's history notes the change, as if made one by one. Entries in a closed period, split entries (for a category) and income given an expense category (or the other way round) are left as they were, and the message says how many. An accountant can use it to tick entries as posted.
Look at a receipt and its files
Click a receipt on the list to open it. Click its photo or PDF to open it in a window: the mouse wheel or + and - zoom, drag to move around, Open in new tab for a bigger view.
Photos are re-saved as a clean copy for reading (turned upright, location data removed). Download original gives you the photo exactly as it was uploaded.
Delete a receipt Owners and members
Open the receipt, press Delete, then Delete again. It leaves the list, the totals and the downloads, and its files go with it. A full copy is kept on record with who deleted it.
Tax rules ask you to keep business records for years (in Canada, six years from the end of the tax year). A receipt still inside that time asks you to tick Delete it anyway first.
Deleted by mistake? Write to support: it can be put back from the record.
Checks and missing bills
Ask a question about an entry
Something unclear about an entry (business or personal, who was there, is the total right)? On its page, open Ask a question, type it and press Send the question. Anyone in the account can ask, an accountant too.
- The account owner and whoever added the entry get an e-mail with the question and a link.
- They answer under the question with Send answer; everyone in the conversation gets an e-mail.
- Whoever asked, or the owner, presses Mark as resolved when it's settled.
The receipts list shows a Questions tile with how many are still open (click it to see those entries), and a Question badge on each. Every question and answer stays in the entry's history.
What "Need a check" means
A receipt gets a check when something looks off. On the list it gets a red dot beside its name (a number when there are more; point at it for what), and it counts in the Need a check tile. On the receipt, and on its form, the field it is about is marked in red.
- Totals don't add up: before taxes, taxes and tip don't make the total.
- A tax looks too high for its rate (often a misread amount).
- GST/HST number missing (Canada): from $100, the receipt must show the supplier's number for you to claim the tax back.
- Learnt from your own entries, with nothing to set up: Unusual amount, Unusual category, Unusual card, Unusual currency, Odd date, and Twice this month for a monthly bill that shows up twice.
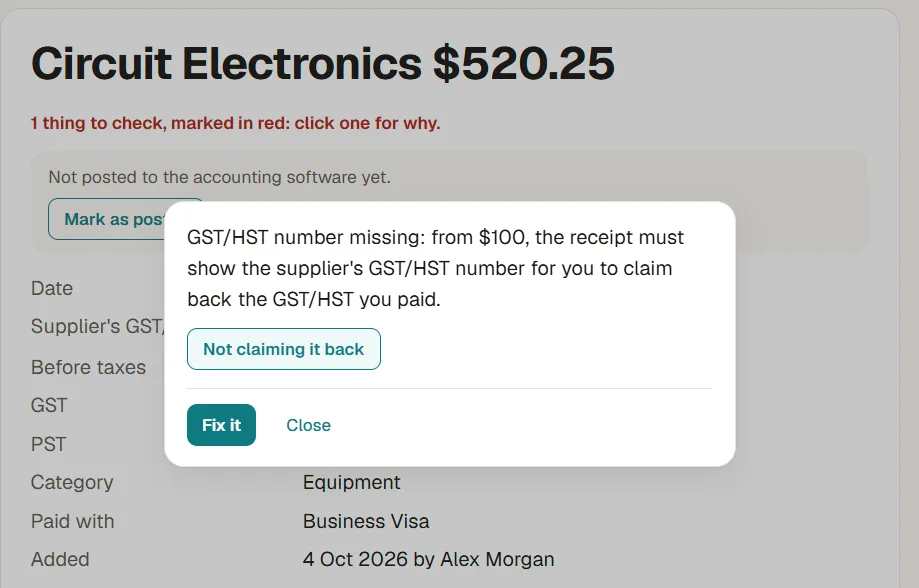
Click a red field for why. Fix it opens the form on that field, with the reason under it; if it's fine, It's right (or Not claiming it back for a missing tax number) sets that one check aside, and it is kept in the history. Each check is dealt with on its own, so saying the amounts are right doesn't hide a missing number. Checked by under the heading lists the ones set aside. For Twice this month, Compare with #12 shows both side by side.
Check for duplicates Owners and members
Check for duplicates on the receipts list shows pairs that look like the same purchase saved twice: the same file, the same date and total, or a bill and its card slip saved separately.
Nothing changes until you choose:
- Keep this one: moves the other one's files onto it, fills its empty details from the other, and removes the other (a copy is kept on record). You see what will happen before pressing Merge.
- Not duplicates: that pair isn't suggested again.
Possibly missing bills
The Possibly missing tile on the receipts list finds businesses that usually come every month (or every year) with nothing entered for a month. It is worked out from your own entries.
- + Add it opens a new entry filled in like the last one.
- Not needed means it wasn't billed that month: it isn't suggested again.
Tax time
Download everything for your accountant
- On Receipts, choose the dates: click the Date heading (on a phone, Sort and filter) and pick Last year, or Last business year if you set a year end.
- Press Download (beside the search box), then With receipt files and summary (ZIP).
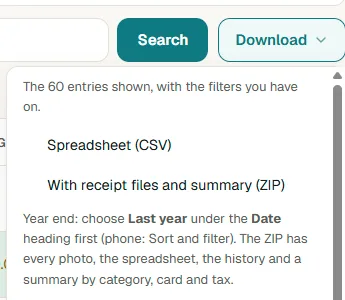
The ZIP has every photo and PDF, named by number, date and business; the untouched originals; a spreadsheet of every entry; the history of changes; and a summary by category, card and tax, with a list of what is still worth a look.
Spreadsheet (CSV) in the same menu gives the spreadsheet on its own. Both downloads take the filters you have on, and have every entry, not only the first 1000. Accountants signed in to your account can download them too.
Tick off what is posted to the accounting software
The Posted column at the end of the receipts list is for whoever keeps the books. Tick an entry once it is entered in the accounting software; it saves straight away, with who and when (point at the tick to see). Owners, members and accountants can all tick it.
- The Posted heading's menu shows only Not posted yet, Posted, or Changed since posted (on a phone: Sort and filter).
- Catching up: choose Not posted yet and the dates, then Mark all as posted. Lost track of where you were? Under the Date heading, set Added to to the day you last worked on it: that shows what was put in up to then.
- If an entry is changed after it was posted (its date, amounts, taxes, category, card...), a red ring shows beside its Posted tick (point at it for what changed). Its page lists what changed; update the books, then press Updated in the books: mark as posted again. A change to the notes alone doesn't count.
- Deleting a posted entry reminds you to remove it from the accounting software too.
The spreadsheet download has a Posted column with the date.
Match a bank or card statement
To find receipts that are missing, and entries that don't belong on a card:
- On the bank's or card's website, download the statement as CSV (look for Download or Export; sometimes called Excel CSV).
- On the receipts list, click Match a statement, choose the file and which card or account it is, and press Upload and match.
- Check the columns (the date, the description, the amount) and press Save and match again if one was guessed wrong.
An entry matches a statement line of the same amount, dated from 10 days before to 3 days after it. Then:
- No receipt: on the statement, not in TillPenny. + Add it opens a new entry filled in from the line, and you come back to the statement. Add without a receipt does the same for a bank fee or interest (no photo needed). Not needed for card payments or personal charges. Ask the owner for these e-mails the account owner the whole list, with a link to the statement.
- Matched: each line with its entry.
- Not on the statement: entries on that card, in those dates, that the statement doesn't show (another card, a duplicate, or a different amount).
Matching is redone each time, so a receipt added later matches by itself. Accountants can use statements too. Deleting a statement removes only its lines, never an entry. Statements hold every line of the card, personal ones too: delete one when you no longer need it.
Files for QuickBooks, Xero or Wave
In the Download menu on the receipts list, under For QuickBooks, Xero or Wave:
- QuickBooks Online bills: for QuickBooks' bill import (Settings, Import data, Bills). Choose Inclusive for sales tax. Up to 100 bills per file; income is left out.
- Bank-statement files for QuickBooks Online, Xero or Wave: date, description and amount, for one card or account at a time (tick one card under Paid with first).
Only entries in the account's own currency go in. An import only accepts names the software already knows, so your accountant's exact names for categories, cards and tax codes go under Accounting software names: the owner opens it from Settings, Categories, and an accountant from the link in the Download menu, to fill in their own names.
GST/HST estimate (Canada)
When your entries include income with GST/HST, the receipts list shows an estimate for the dates shown: GST/HST collected on income, less what you paid on receipts you can claim back.
Receipts without the supplier's GST/HST number are left out, because the tax can't be claimed back without it (from $100). It is an estimate: check the return with your accountant. Return figures beside it, or GST/HST return at the top right of the receipts list, opens the figures for the return's main lines (101 sales, 103 GST/HST collected, 106 input tax credits, 109 net tax) for this quarter, last quarter or any dates.
Close a filed period Owners and accountants
Once a GST/HST return or the year-end is filed, close the books through its last day, so the entries keep matching what was filed: on the return figures page, Filed this return? Close the books through ..., or Closed periods (also linked from Settings, Account).
Entries dated then or before can't be added, changed, deleted, merged or marked personal; they show In a closed period. Questions, the Posted tick and setting a check aside still work. Only the owner can reopen (for an amended return, say): move the date back, or Open everything. Each close and reopen is kept in Activity.
Receipts in another currency
Type the 3-letter code (like USD) in Currency on the form. Entries in other currencies are kept apart in the totals (Also in USD under the tiles) and listed in the summary to convert at the rate of the day. The QuickBooks, Xero and Wave files leave them out.
Settings
Account settings Owners
Settings, Account:
- Account name: usually the business name; everyone in the account sees it at the top.
- Country: sets the usual tax names on the form and helps the reading with dates and amounts.
- Currency, Time zone.
- Business year ends on: 31 December for a sole proprietor; a corporation's year can end on any day (ask your accountant). It gives the date filters This business year and Last business year.
- Look: your own logo (PNG, JPEG or WebP, a wide one on a transparent background looks best) and colour.
Receipt fields and required fields Owners
Settings, Receipt fields turns optional fields on or off and chooses which are required:
- Paid by: who paid (a person, or "Sam, Alex" for two together).
- Your own list, like properties or vehicles: give it a name and its items.
- Project: free text, with earlier projects suggested.
Date, paid to and total are always required, and a receipt always needs its photo or PDF. Required fields apply to the forms, bulk upload and changes. Turning a field off only hides it: entries keep what was entered.
Categories, cards and Paid by Owners
- Settings, Categories: Expenses and Income lists. An empty list offers Add the suggested categories.
- Settings, Cards and accounts: what you pay with. Add the last 4 digits of each card and a scanned receipt picks the card by itself. With several people, each card can be shown to everyone or only to some (each person's own card, say).
- Settings, Paid by (when that field is on): the people who pay.
Items can't be deleted, only archived: Archive hides one from the forms, old receipts keep it, and Bring back returns it.
Add people and change their access Owners
Settings, People, then Add a person: their name, e-mail, role (who can do what) and a first password that you pass on to them yourself. At their first sign-in they choose their own password and set up two-step sign-in on their phone. An e-mail address can belong to one account only.
For each person you can Change role, Turn access off (and back on), or Give a new password (they choose their own again at their next sign-in). Each of these signs them out everywhere. You can't change your own role or access there; your own password is on Your sign-in.
Activity and history
- Each receipt has a History: when it was added, every change (old and new value), files added, checks cleared, merges. Nothing in it can be changed.
- Owners: Settings, Activity shows who did what in the account, newest first: sign-ins and wrong tries, settings, lists, people, downloads and every receipt change. Filter by What and Who.
Signing in
Your sign-in: password, devices, recovery codes
Click your name at the top of any page to open Your sign-in. It is about you only:
- Save the new password: change your password (type the current one first). Every other browser and phone is signed out.
- Sign out everywhere else: after losing a phone or laptop, or signing in on someone else's computer. This browser stays signed in.
- Stop trusting all my devices: every trusted device asks for the code again.
- Make new recovery codes: when you're running low, or think someone saw them. The old ones stop working.
- Summary e-mail: off, or every day, week (choose the day) or month. Around 7:00 your time you get what's new: entries added, not posted yet, changed since posted, open questions, possibly missing and needing a check. Nothing new, no e-mail.
Two-step sign-in
Everyone signs in with their password and a 6-digit code from an authenticator app on their phone (Google Authenticator, Microsoft Authenticator, or the one in your password manager). It keeps your receipts safe even if someone learns your password.
The first time, the page shows a QR code to scan with the app (on the phone itself: Tap here to add it to your authenticator app). Type the code it shows and press Turn on two-step sign-in.
Then you get 10 recovery codes, shown once. Keep them somewhere safe, away from your phone: each works once if you lose the phone. Running low? Make new ones on Your sign-in.
Lost or new phone
On the code page, type one of your recovery codes (like abcd-efgh) in the Code box instead of a code. Each recovery code works once.
No recovery codes left, or none saved? Write to support from your sign-in e-mail address: two-step sign-in is reset after checking it's you, and you set it up again on the new phone at your next sign-in.
After losing a laptop or phone: on Your sign-in, Sign out everywhere else and Stop trusting all my devices. Then make new recovery codes there.
Forgot your password
On the sign-in page, Forgot your password?, type your sign-in e-mail and Send the link. The link works once, for 60 minutes. After choosing a new password you sign in with it and your authenticator code as usual, and you are signed out everywhere else.
To change your password while you still know it: Your sign-in. An account owner can also set a new one for you under Settings, People; you then choose your own at your next sign-in.
"Too many wrong tries"
After 5 wrong codes, signing in waits 15 minutes; each time again in a row it waits twice as long, up to a day. Too many wrong passwords or codes from one place wait 15 minutes.
Check the code is the newest one in the app (it changes every 30 seconds), and that the phone's clock is set automatically. Your access to this account is turned off means the account owner turned it off: ask them.
Staying signed in and trusted devices
You stay signed in for up to 30 days on the same browser, then sign in again. Tick Trust this device for 30 days on the code page to skip the code there (your password is still asked). Only on your own device, never a shared one. Your sign-in lists your trusted devices.
On a shared computer, press Sign out when you're done: receipt files aren't kept in the browser after signing out.
Still stuck, or an idea to make TillPenny better? Write to support@tillpenny.com: a person reads every message.